
springboot+mybatis+spring security项目实例----入门实例
日期: 2019-10-17 分类: 个人收藏 536次阅读
springboot+mybatis+spring security项目实例----入门实例
spring security的介绍
Spring Security是一个功能强大且高度可定制的身份验证和访问控制框架。它是用于保护基于Spring的应用程序的实际标准。
Spring Security是一个框架,致力于为Java应用程序提供身份验证和授权。与所有Spring项目一样,Spring Security的真正强大之处在于可以轻松扩展以满足自定义要求。官方文档主要介绍了其四种特征:
1.对身份验证和授权的全面且可扩展的支持
2.防御会话固定,点击劫持,跨站点请求伪造等攻击
3.Servlet API集成
4.与Spring Web MVC的可选集成
这里我们主要基于身份验证的管理。其实这是我第一次写博客,有什么问题还请大家谅解,多多在评论区指出
创建数据库
由于项目需求,我们需要验证和授权都要做到,所以说数据库的设计是用户-用户组-角色-权限。但是我刚学习只是用到了用户这张表,道理都是一样的,我们先来讲讲登录验证的代码块吧!
- 创建用户表
CREATE TABLE `user` (
  `id` varchar(255) NOT NULL,
  `username` varchar(255) NOT NULL,
  `password` varchar(255) NOT NULL,
  PRIMARY KEY (`id`)
) ENGINE=InnoDB DEFAULT CHARSET=utf8mb4 COLLATE=utf8mb4_0900_ai_ci;
- 初始化数据
INSERT INTO `user` VALUES ('1', 'admin', '123');
INSERT INTO `user` VALUES ('2', 'asd', '123');
创建springboot+mybatis项目,准备页面
创建流程就不用说了,下面直接到项目中
- 导入spring-boot-starter-security部分的依赖
 <dependency>
            <groupId>org.springframework.boot</groupId>
            <artifactId>spring-boot-starter-security</artifactId>
        </dependency>
          <dependency>
            <groupId>org.springframework.boot</groupId>
            <artifactId>spring-boot-starter-thymeleaf</artifactId>
        </dependency>
- 准备页面
示例程序,页面越简单越好,只用于登陆的login.html以及用于登陆成功后的home.html,将其放置在 resources/templates 目录下:
(1)login.html
<!DOCTYPE html>
<html xmlns:th="http://www.thymeleaf.org">
<head>
    <meta charset="UTF-8">
    <title>Insert title here</title>
</head>
<body>
<h1 align="center">欢迎登陆</h1>
<hr>
<div align="center">
    <form th:action="@{/userlogin}" method="post">
        用户名:<input name="user"/><br>
        密码:<input name="pwd"><br/>
        <input type="checkbox" name="remeber"> 记住我<br/>
        <input type="submit" value="登陆">
    </form>
</div>
</body>
</html>
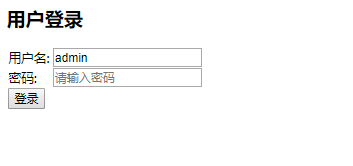
(2)login-errpr.html
<!DOCTYPE HTML>
<html xmlns="http://www.w3.org/1999/xhtml"
      xmlns:th="http://www.thymeleaf.org">
<head>
    <title>用户登录</title>
    <link rel="stylesheet" href="https://cdn.bootcss.com/bootstrap/3.3.7/css/bootstrap.min.css" />
    <link rel="stylesheet" href="/css/sign.css" />
</head>
<body>
<h3>用户名或密码错误</h3>
</body>
</html>
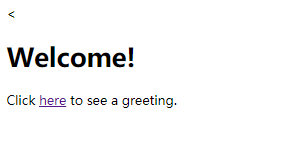
(3)home.html
<!DOCTYPE html>

<html xmlns="http://www.w3.org/1999/xhtml" xmlns:th="http://www.thymeleaf.org" xmlns:sec="http://www.thymeleaf.org/thymeleaf-extras-springsecurity3">
<head>
    <meta charset="UTF-8">
    <<title>Spring Security Example</title>
</head>
<body>
<h1>Welcome!</h1>

<p>Click <a th:href="@{/hello}">here</a> to see a greeting.</p>
</body>
</html>
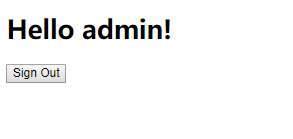
(4)hello.html
<!DOCTYPE html>
<html xmlns="http://www.w3.org/1999/xhtml" xmlns:th="http://www.thymeleaf.org"
      xmlns:sec="http://www.thymeleaf.org/thymeleaf-extras-springsecurity3">
<head>
    <title>Hello World!</title>
</head>
<body>
<h1 th:inline="text">Hello [[${#httpServletRequest.remoteUser}]]!</h1>
<form th:action="@{/logout}" method="post">
    <input type="submit" value="Sign Out"/>
</form>
</body>
</html>
配置application.properties
server.port=8070

spring.datasource.driver-class-name=com.mysql.cj.jdbc.Driver
spring.datasource.url=jdbc:mysql://127.0.0.1:3306/security?characterEncoding=utf-8&useSSL=false&serverTimezone=Asia/Shanghai
spring.datasource.username=root
spring.datasource.password=123456

mybatis.typeAliasesPackage=com.spring.security.entity
mybatis.mapperLocations=classpath:mapper/*.xml

spring.thymeleaf.prefix=classpath:/templates/
spring.thymeleaf.suffix=.html
spring.thymeleaf.mode=LEGACYHTML5
spring.thymeleaf.encoding=UTF-8
spring.thymeleaf.cache=false
创建实体类等
- User实体类
public class User implements Serializable {

    private String id;
    private String username;
    private String password;

    //setter getter省略
    }
注意实体类需要序列化
- Usermapper.xml映射
<?xml version="1.0" encoding="UTF-8"?>
<!DOCTYPE mapper PUBLIC "-//mybatis.org//DTD Mapper 3.0//EN" "http://mybatis.org/dtd/mybatis-3-mapper.dtd">
<mapper namespace="com.spring.security.mapper.Usermapper">

    <select id="getById" resultType="com.spring.security.entity.User">
		select * from user where id = #{id}
	</select>

    <select id="getByUsername" resultType="com.spring.security.entity.User">
		select * from user where username = #{username}
	</select>

    <select id="getByPassword" resultType="com.spring.security.entity.User">
		select * from user where password = #{password}
	</select>

</mapper>
- mapper接口
@Mapper
public interface Usermapper {
    User getById(@Param("id") String id);

    User getByUsername(@Param("username") String username);

    User getByPassword(@Param("password") String password);

}
- Controller控制层
@Controller
public class LoginController {
        @RequestMapping("/login")
        public String userLogin(){
                return "demo_sign";
        }


        @RequestMapping("/login-error")
        public String loginError(){
                return "login-error";
        }

}
这基本的工程已经完成,下面开始spring security的配置
配置SpringSecurity
先自定义UserDetailsService类来实现UserDetailsService类,并且重载loadUserByUsername(String s)方法,s是用户输入的用户名,将用户信息注入进来
@Service
public class LocalUserDetailsService implements UserDetailsService {
        @Autowired
        private Usermapper usermapper;

    @Override
    public UserDetails loadUserByUsername(String username) throws UsernameNotFoundException {
        if (username.isEmpty()) {
                throw new UsernameNotFoundException("用户名不能为空");
        }else {
            User user = usermapper.getByUsername(username);
            if (user==null){
               user =  usermapper.getByPassword(username);
            }
            if (user==null){
                throw new UsernameNotFoundException("用户名不存在");
            }else {
                return new org.springframework.security.core.userdetails.User(user.getUsername(),user.getPassword(),true,true,true,true,AuthorityUtils.NO_AUTHORITIES);
            }
        }
    }
}
WebSecurityConfig
WebSecurityConfig是spring security的配置类,一般情况下该类有两个注解@Configuration和@EnableWebSecurity。分别表示该类是配置类、开启security服务。我们需要在该类中将我们自定义的UserDetailsService给注入进来,后面config(AuthenticationManagerBuilder auth)类中需要进行验证
@Configuration
@EnableWebSecurity
public class WebSecurityConfig extends WebSecurityConfigurerAdapter {

    @Autowired
    private LocalUserDetailsService localUserDetailsService;

    @Override
    protected void configure(HttpSecurity http) throws Exception {
        // TODO Auto-generated method stub
        //super.configure(http);
        http
                .formLogin().loginPage("/login").loginProcessingUrl("/login/form").failureUrl("/login-error").permitAll()  //表单登录,permitAll()表示这个不需要验证 登录页面,登录失败页面
                .and()
                .authorizeRequests().anyRequest().authenticated()
                .and()
                .csrf().disable();
    }
    @Override
    protected void configure(AuthenticationManagerBuilder auth) throws Exception{

        auth
                .userDetailsService(localUserDetailsService)
                .passwordEncoder(NoOpPasswordEncoder.getInstance())
                ;
//                .inMemoryAuthentication()
//                .passwordEncoder(new MyPasswordEncoder())//在此处应用自定义PasswordEncoder
//                .withUser("admin").password("123456").roles("USER")
//                .and()
//                .withUser("test").password("test123").roles("ADMIN");
    }

    @Bean
    UserDetailsService customUserService() {
        return new LocalUserDetailsService();
    }

    @Bean
    public BCryptPasswordEncoder passwordEncoder() {
        return new BCryptPasswordEncoder();
    }
}
注明:在configure(AuthenticationManagerBuilder auth)方法中,我刚开始是使用passwordEncoder(new MyPasswordEncoder())来验证密码的,会报一个Encoded password does not look like BCrypt错误,所以我将new MyPasswordEncoder()改成了NoOpPasswordEncoder.getInstance()。原因是springsecurity在最新版本升级后,默认把之前的明文密码方式给去掉了
解决方式:
1. 一般我们客户端账号密码不需要加密,所以在这里实现 .passwordEncoder(NoOpPasswordEncoder.getInstance()) 告诉security客户端密码不需要加密
2. 使用BCryptPasswordEncoder将数据库中client密码加密
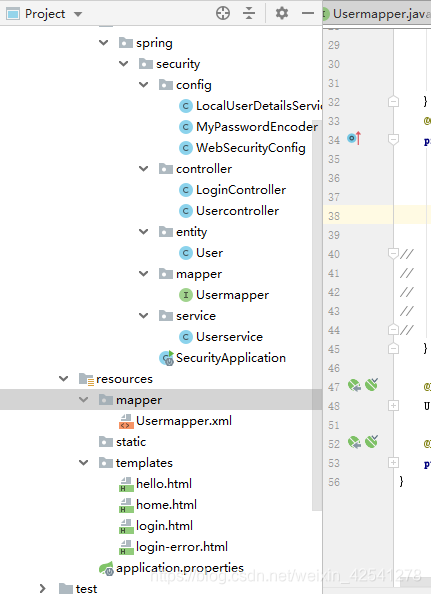
这是我项目的一个总体结构
运行程序
注:可能很多地方写的不是很详细,注释也不是很多,但是希望大家更多的是自己百度,自己加深印象。再送大家一句话,其实学编程就是一个不断积累的过程。
除特别声明,本站所有文章均为原创,如需转载请以超级链接形式注明出处:SmartCat's Blog
精华推荐